24. It’s important to make sure your hands are clean while installing the seat cover as to not get any grease or dirt on it. We recommend washing your hands often while installing the new cover.
25. Take your new bottom cover and flip it over. Locate the white flap of material towards the rear of the cover. Measure to the middle of the white flap and make a mark. We highly suggest using a pencil to make the mark, so you won’t get ink on your hand, and then on the cover. We used a black marker to easily show in the pictures. Once you have found the center, mark 1 1/4 inches on each side of the center, then mark 2 1/2 inches on the sides of that. It should look like the picture below. Once you have it all marked out, you will need to make holes where the 4 marks are(not the center mark). We would suggest using a hole punch, or leather punch to cut the holes, but a razor blade will work too. The holes don’t need to be very big, just big enough to put a zip tie through. Be very careful when using a razor blade to cut the holes, so you don’t cut the cover, or yourself. The holes only need to be about 1/8 inch long.

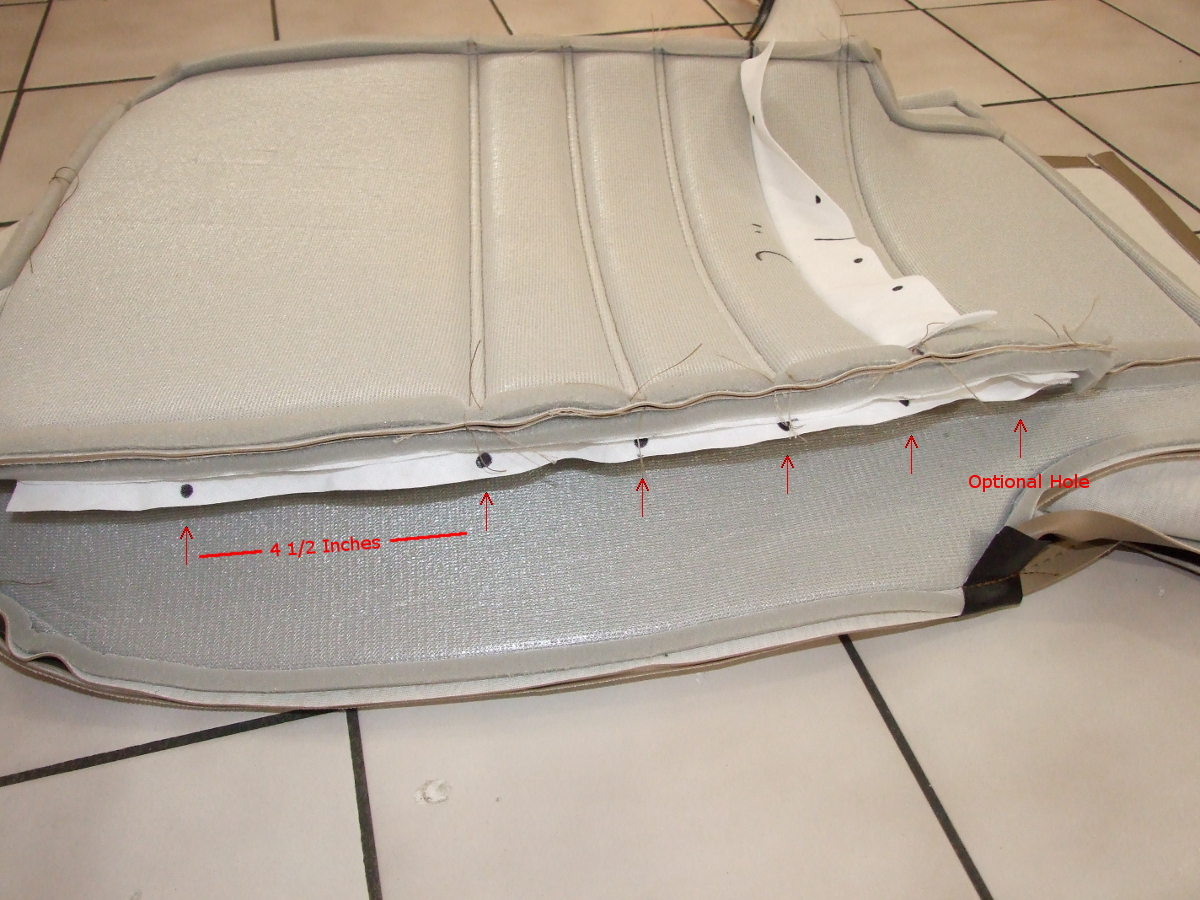
26. Now we are going to do basically the same thing, but on the sides. Locate the side white material flap, and make a mark directly out from where the stitch lines are. Which are about 2 1/4 inches apart. Then towards the front you will want to measure 4 1/2 inches and make another mark. Once it looks like the picture below you are ready to cut out the marks you made. Remember the holes only need to be about 1/8 inches long. Then repeat this for the other side of the cover.
27. Slide the middle(smallest rod) and both side rods(longest rod) into the white flap material.
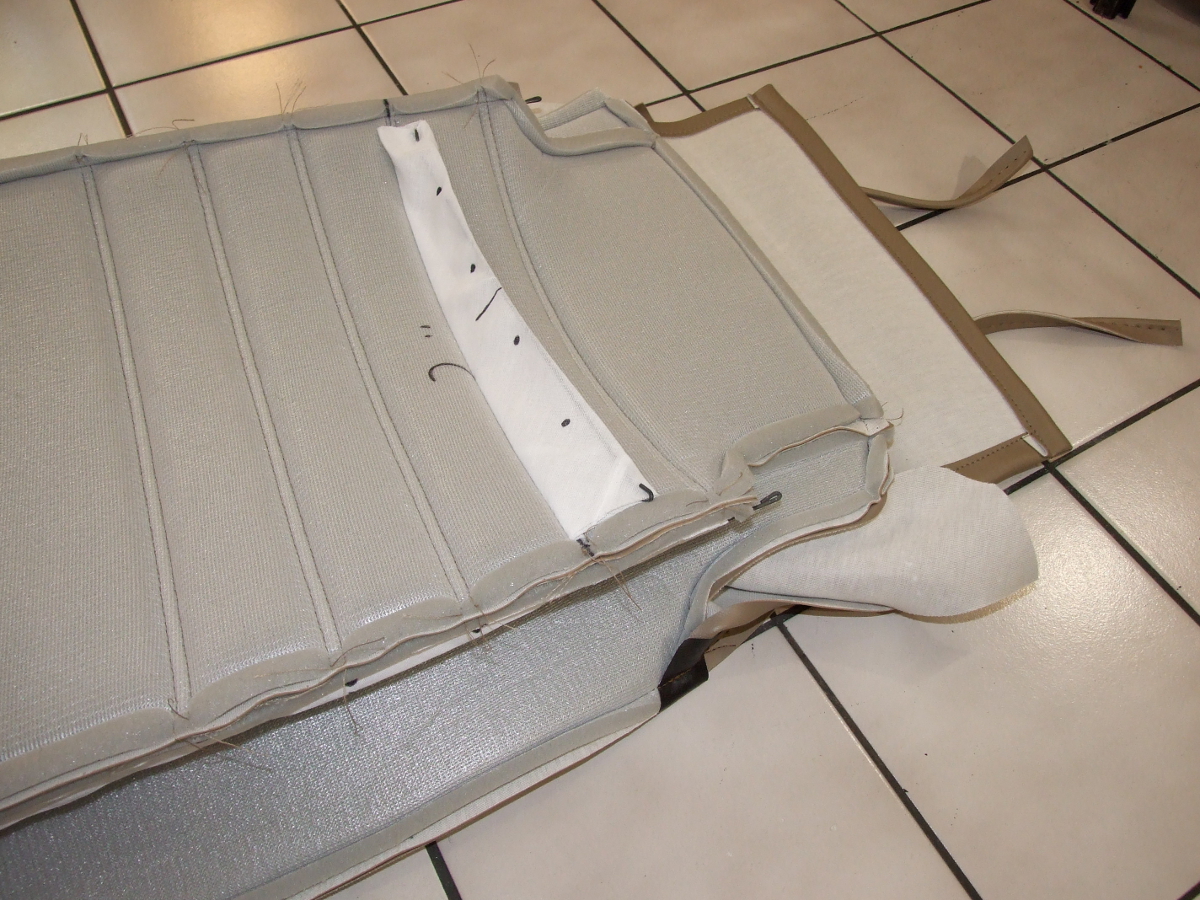
27.5 If you have seat heaters now would be the time to install them.
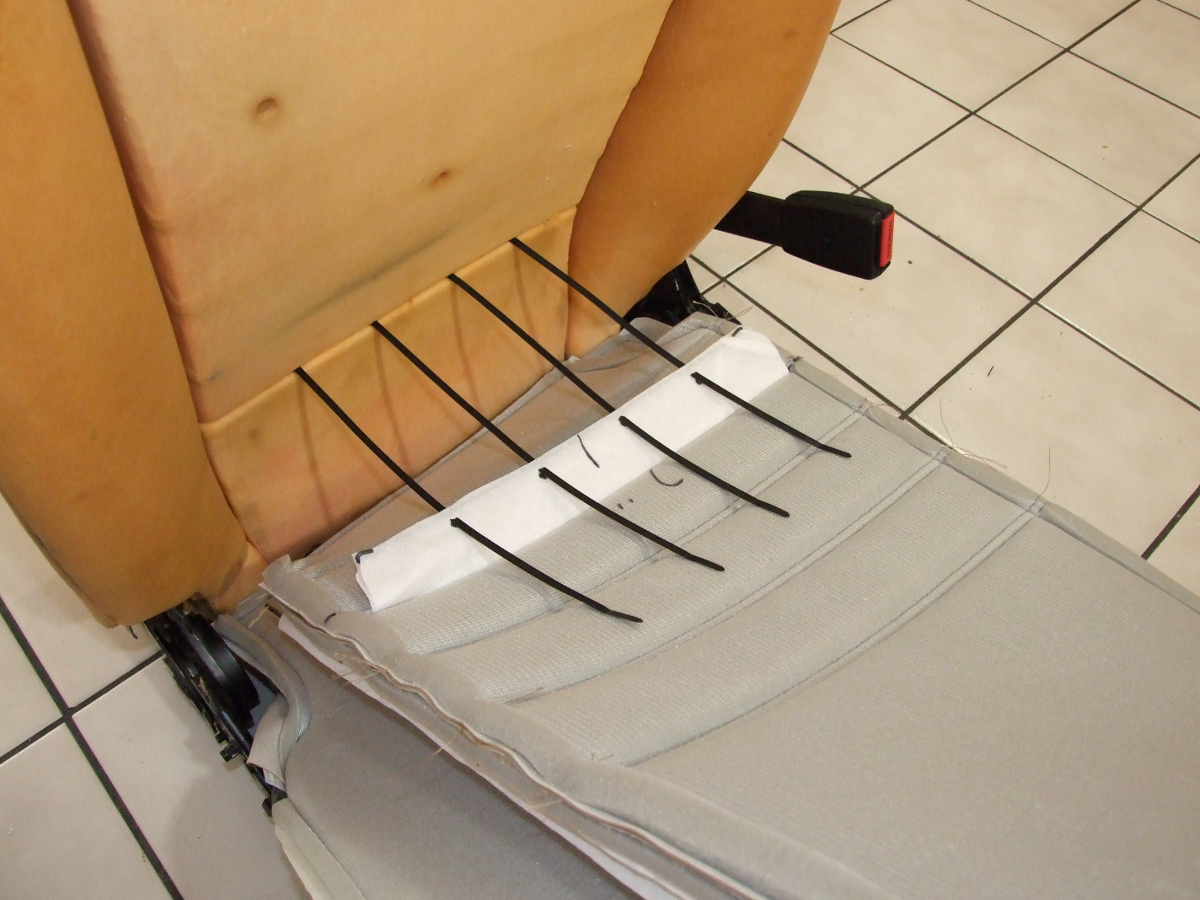
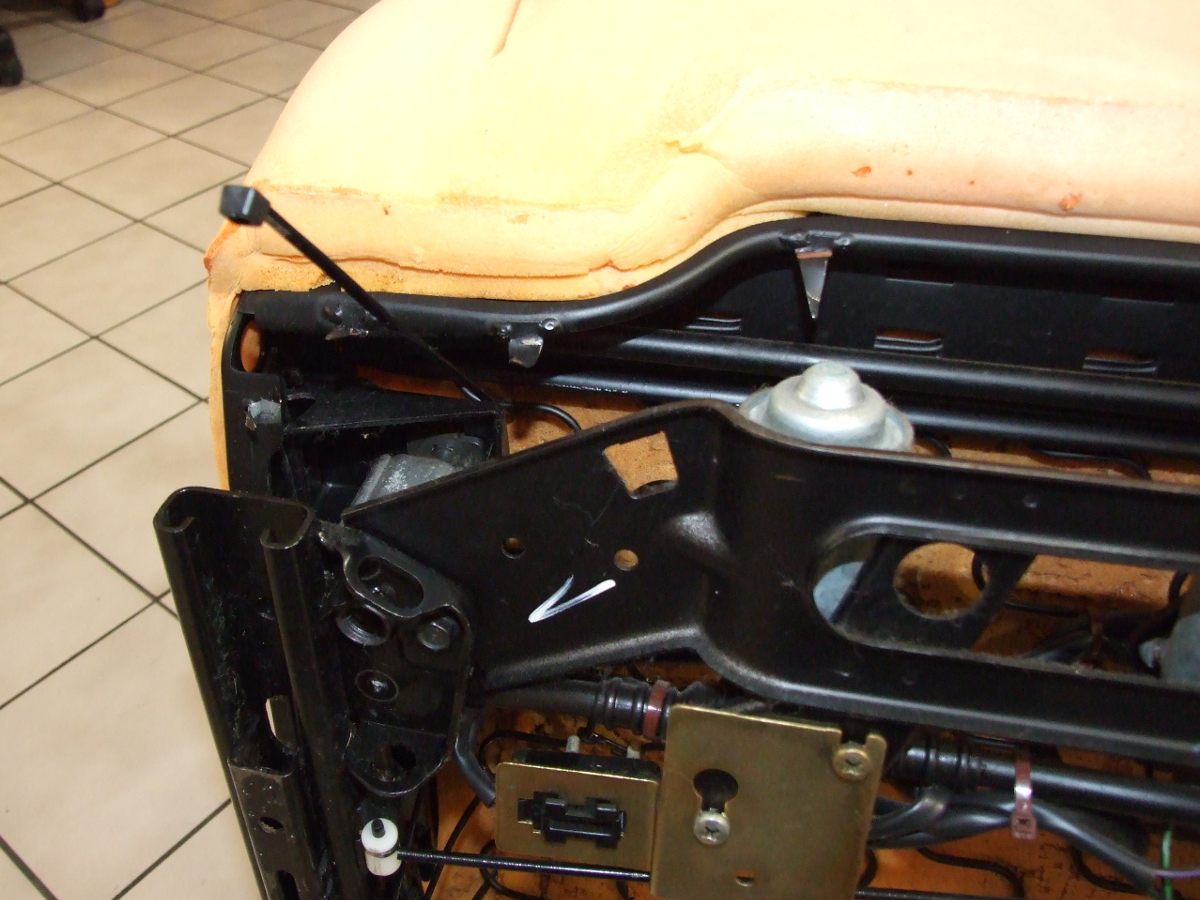
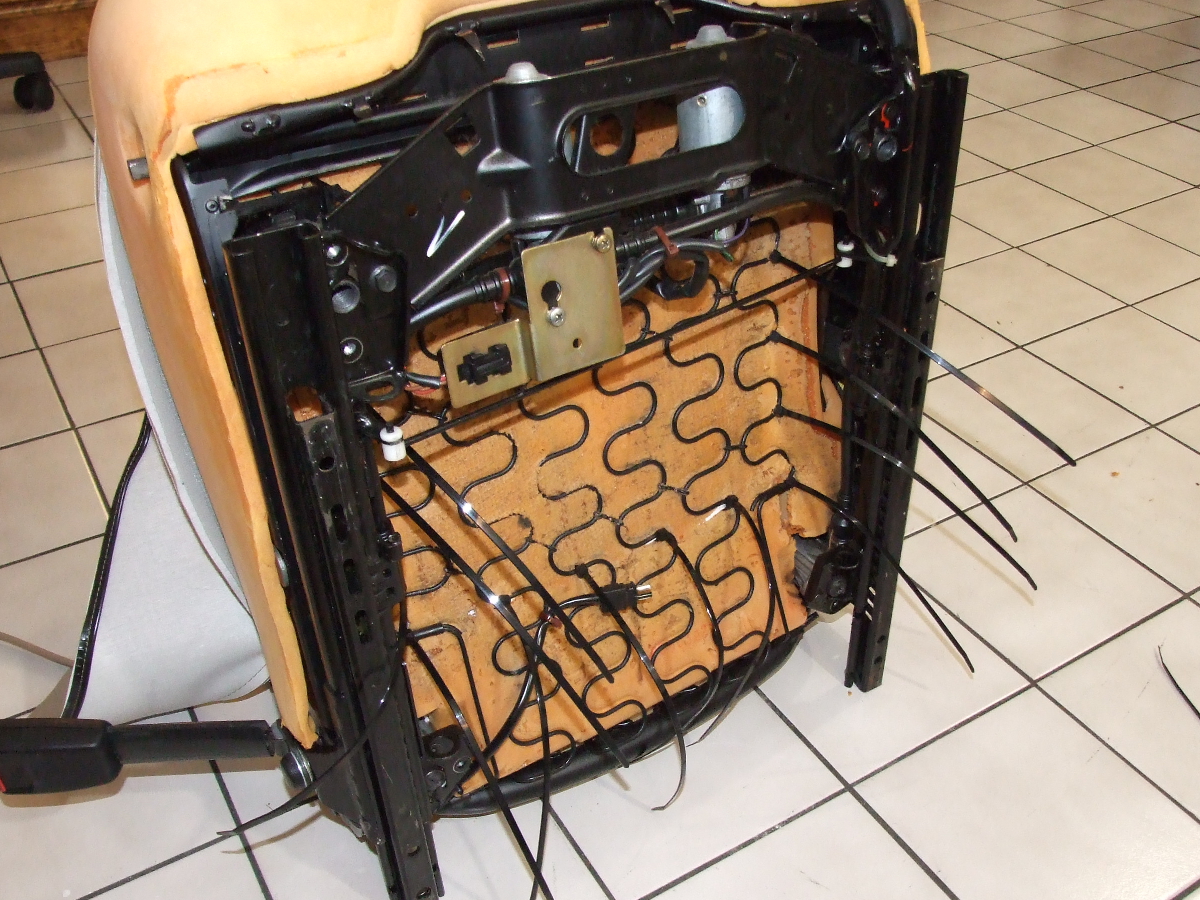
28. Now take the seat and put it on end so you can easily get to both the top and bottom. Insert 4 zip ties in the exact same location as in the picture.


29. Take your new seat cover and put each of the zip ties through the middle white flap holes. The metal rod must be at the bottom of the white flap, so that the zip ties can loop around it and pull the metal rod. If the metal rod is on the wrong side of the zip ties, then the zip ties will pull through the material, and not hold the cover tight at all.
30. Loop each zip tie over and put them back through the bottom of the seat. When they come out the bottom make sure they are looped around the black curvy metal rod on the bottom of the foam. DO NOT tighten the zip ties yet, just tighten them enough so they stay together. They will get fully tightened later.
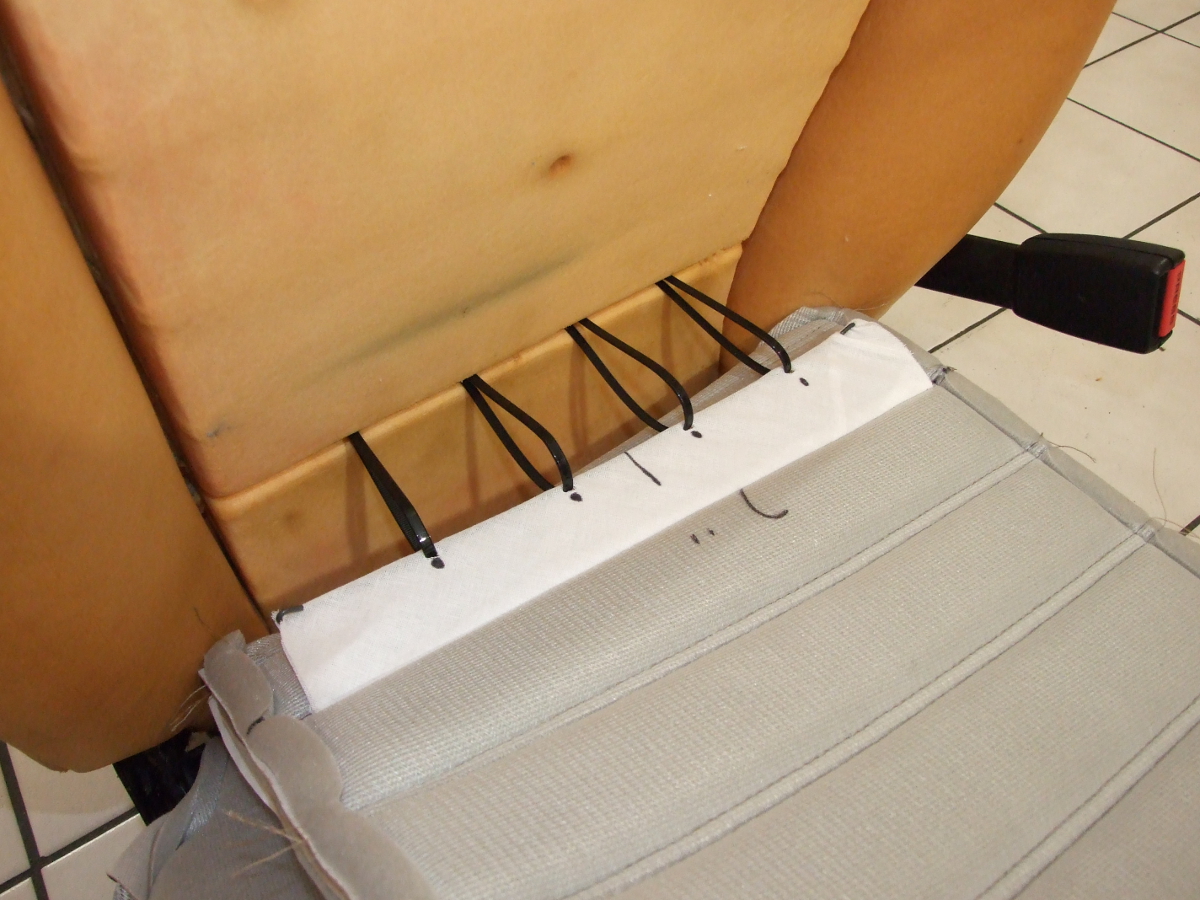

31. Now we will do the same thing but for the sides. Thread zip ties through the bottom of the seat, beside the curvy metal rods, just like in the pictures. Then thread one zip tie through the top of the seat, by the curvy metal rods in the front of the seat. This one is a little bit trickier to get to(second picture).

32. Once you have the zip ties through the seat, loop the zip ties through the side white flaps and over the metal rods and back through the seat to the bottom. Once again you will want to loop the zip tie around the curvy metal rod on the bottom of the seat, and only tighten them a little.
33. When you have one side complete you can do the same steps for the other side, and it should look like the picture below.

34. Now you can go ahead and start tightening the zip ties. Tighten one a little and then move to the next one. Tightening them like you would wheel lug nuts. Don’t just pull one all the way tight first. Gradually tighten each zip tie. This will evenly pull the seat cover down and get the best possible results.
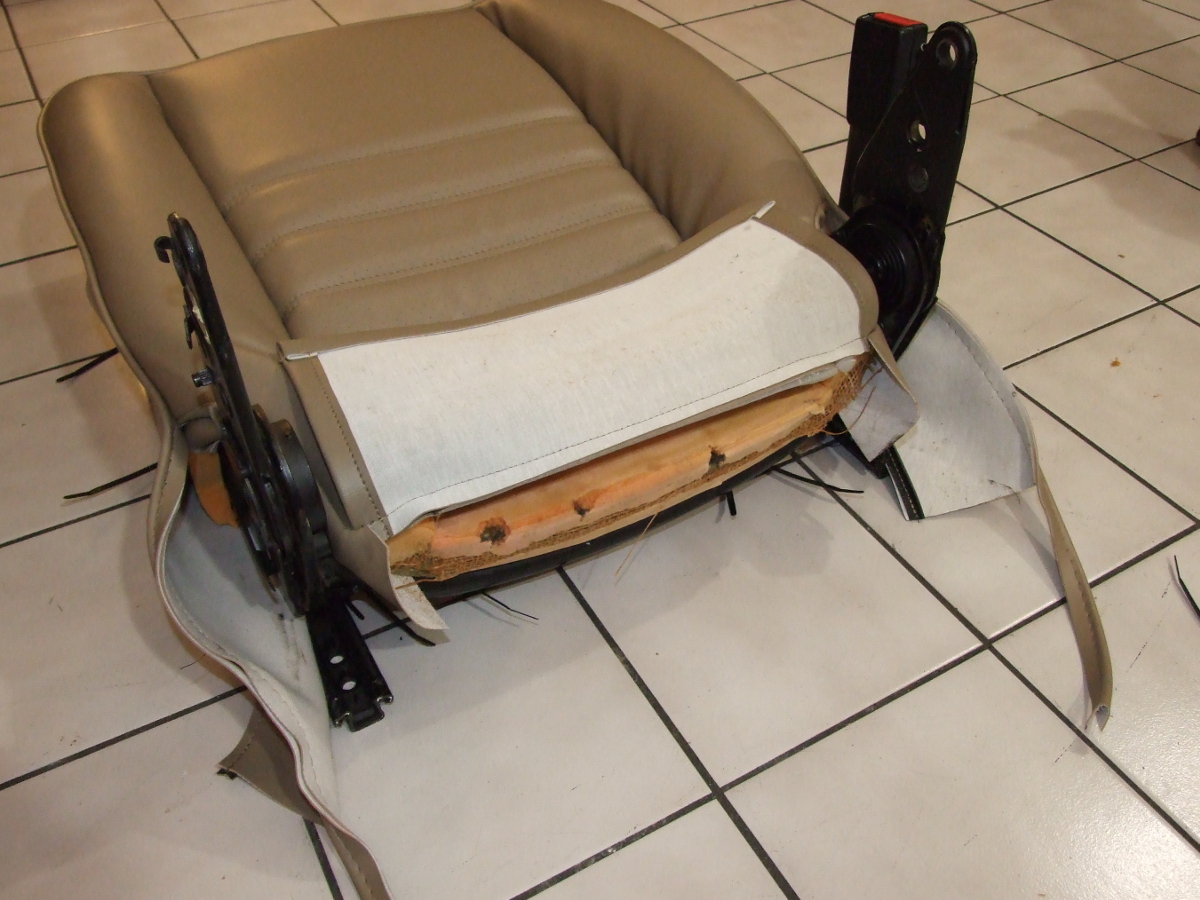
35. Now that all the zip ties are tight you can start to install the cover over the sides. Fold the sides of the seat cover over the seat foam. This might be a little tough, but it will go. Then work the foam and seat cover until it looks good. If the cover is a little loose or strange looking you can “massage” the cover and foam and make it look better. Try compressing the foam and pulling on the cover. Once you think it looks good you can attach the front of the cover. Stretch the cover tight around the front of the seat and push the metal clips through the cover, and fold the clips over the cover to hold it tight.
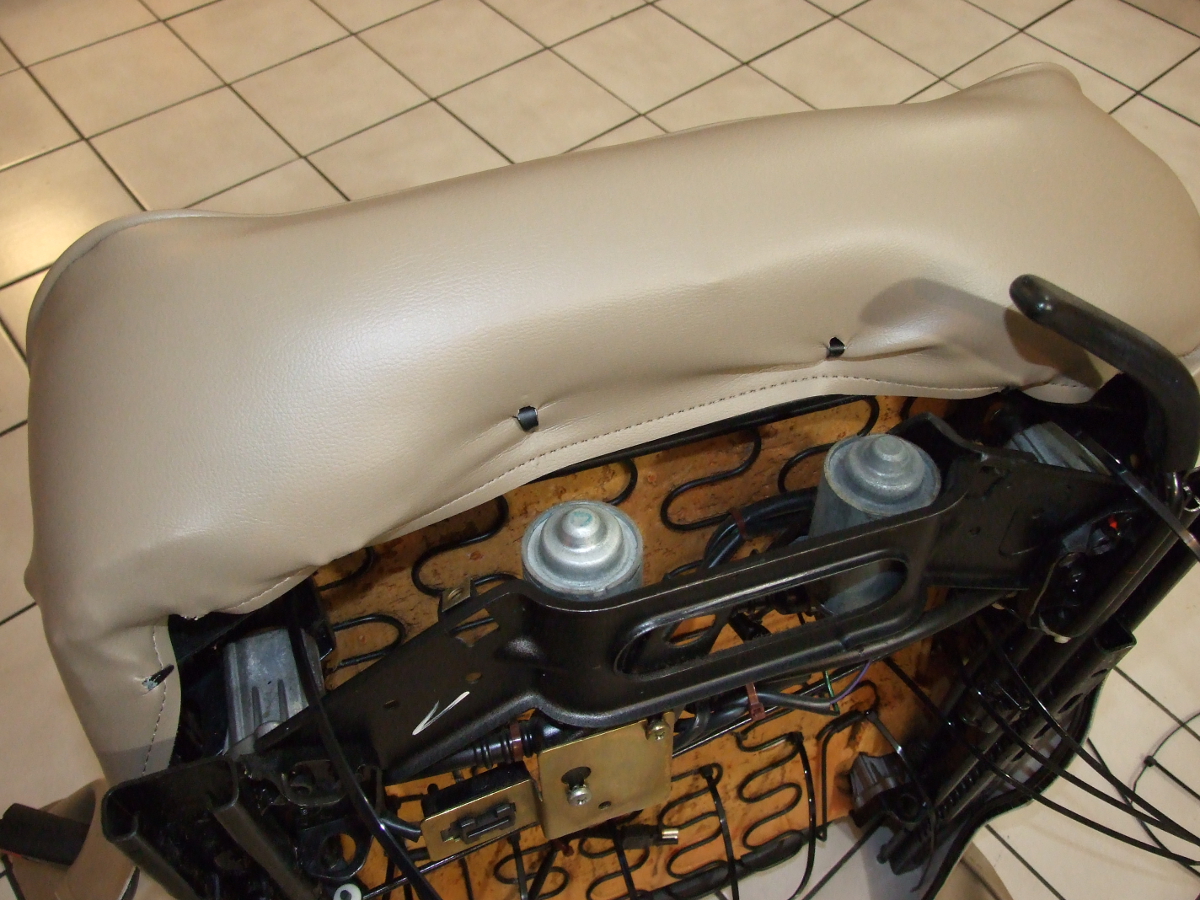
36. Work your way along one side of the cover, stretching it tight and pushing the metal clips through the cover. This will need to be done in the same manor that you removed the cover. You might need to remove the seat rail bolts to gain access to the metal clips. Once you have one side finished work on the other side. Remember to stretch the cover tight and work the foam if needed.
* Note that we are not making any cuts in the material yet. Stretch the cover tight over the seat switches and the metal arm on the other side. We will cut the holes later, and it will be easy*
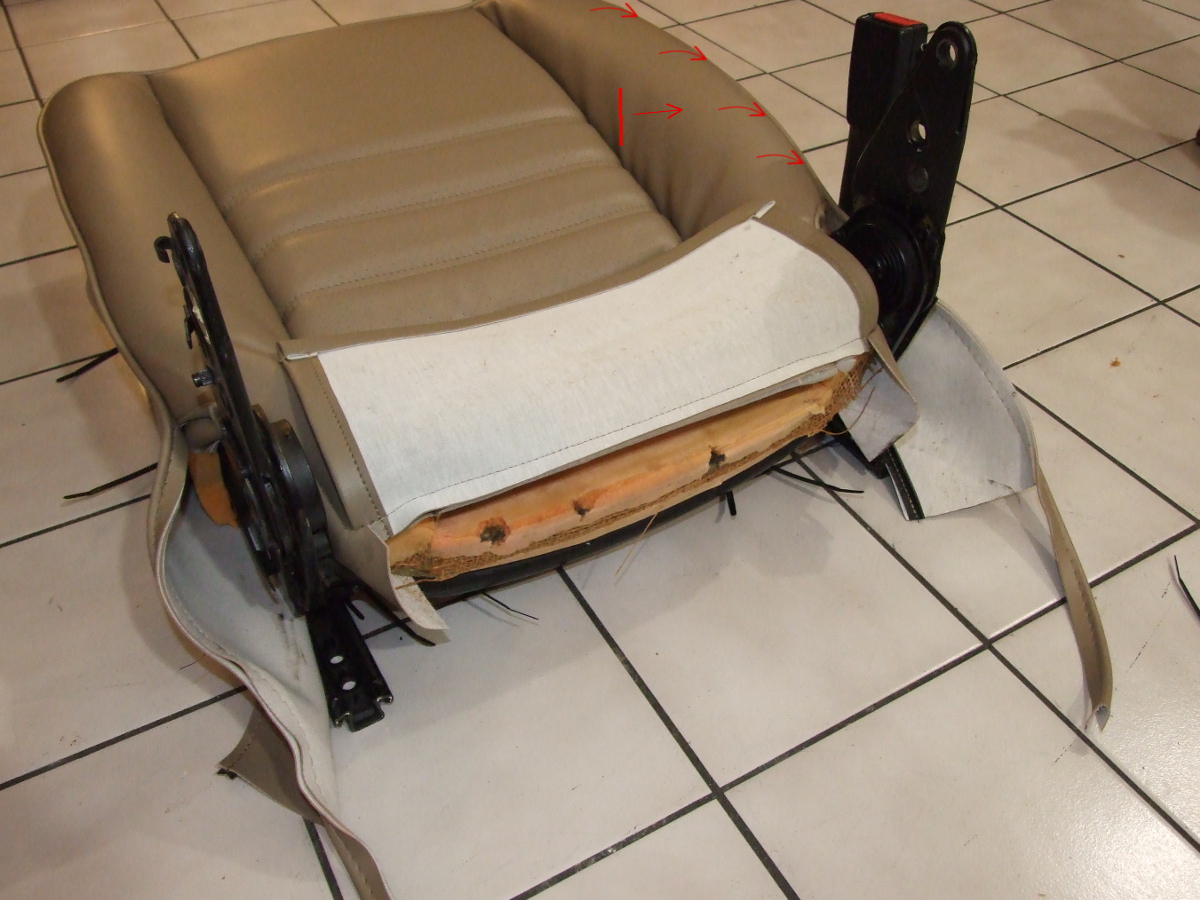
37. Now your cover should look like this. Note the wrinkles in the right side of the seat. After taking this picture we went back and reworked the cover, compressing the foam and stretching the cover more and in the right direction and were able to remove all the wrinkles. If you are not happy with the way the cover is coming out, stop, and work on that area until it’s good. It’s much easier to fix it now, than later.
37.5 Here is how we removed these wrinkles. Pull the material perpendicular to the wrinkles. The red line shows the wrinkle angle. And the red arrow shows the direction that we pulled the cover. This will remove the wrinkles.
38. Now we need to tie the rear of the cover together. There is no right or wrong way to do this, but this is what we have done. Tie a knot, with a zip tie in it, in the material like we did, but farther forward would work a little better, around where the arrow is would be best.
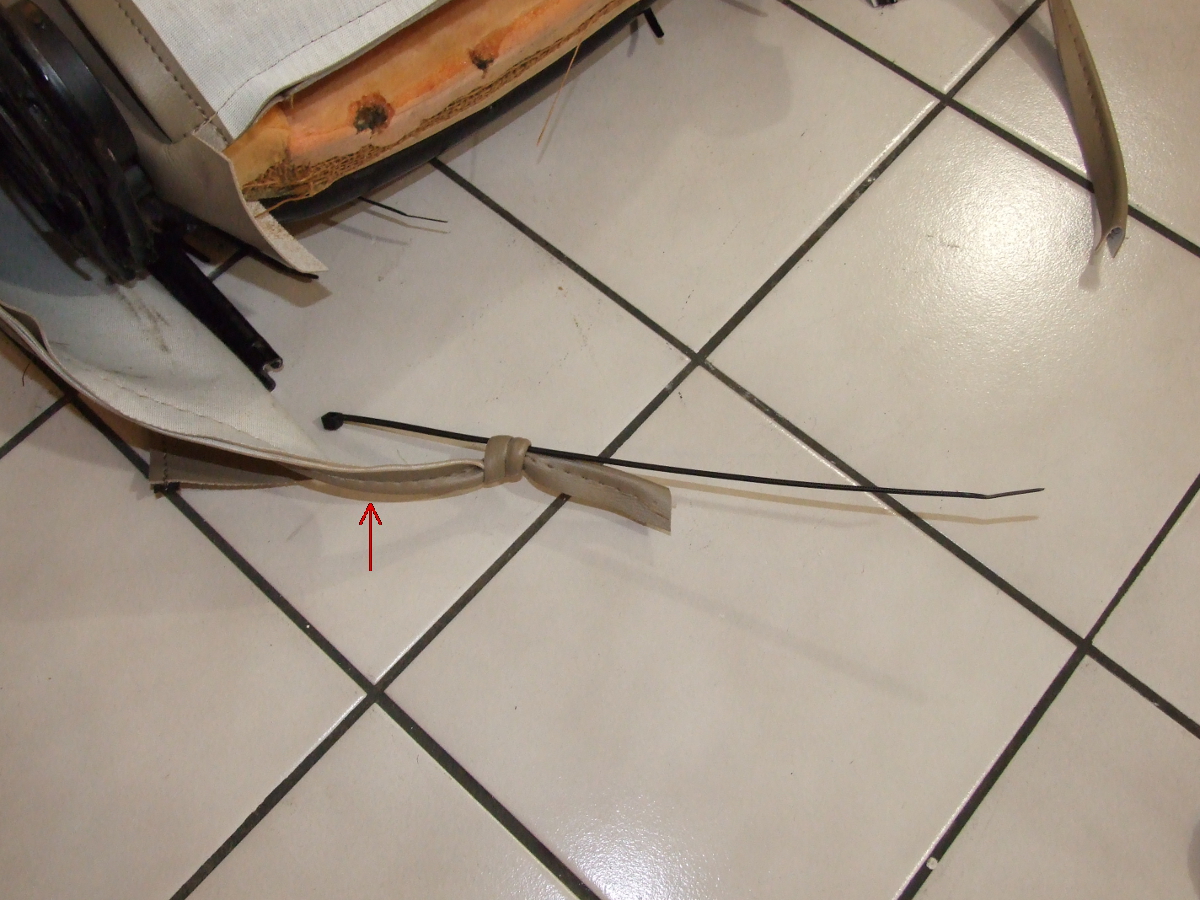
39. Then tie another knot in the other side, and thread the zip tie through it and loop the zip tie together. Then, stretch the cover and tighten the zip tie. This will stretch the cover tight and finish the sides. This can also be achieved by simply tying the two piece of material together in a knot. We have found that it’s much harder to stretch the material and keep it tight this way, and the zip tie method works much better.
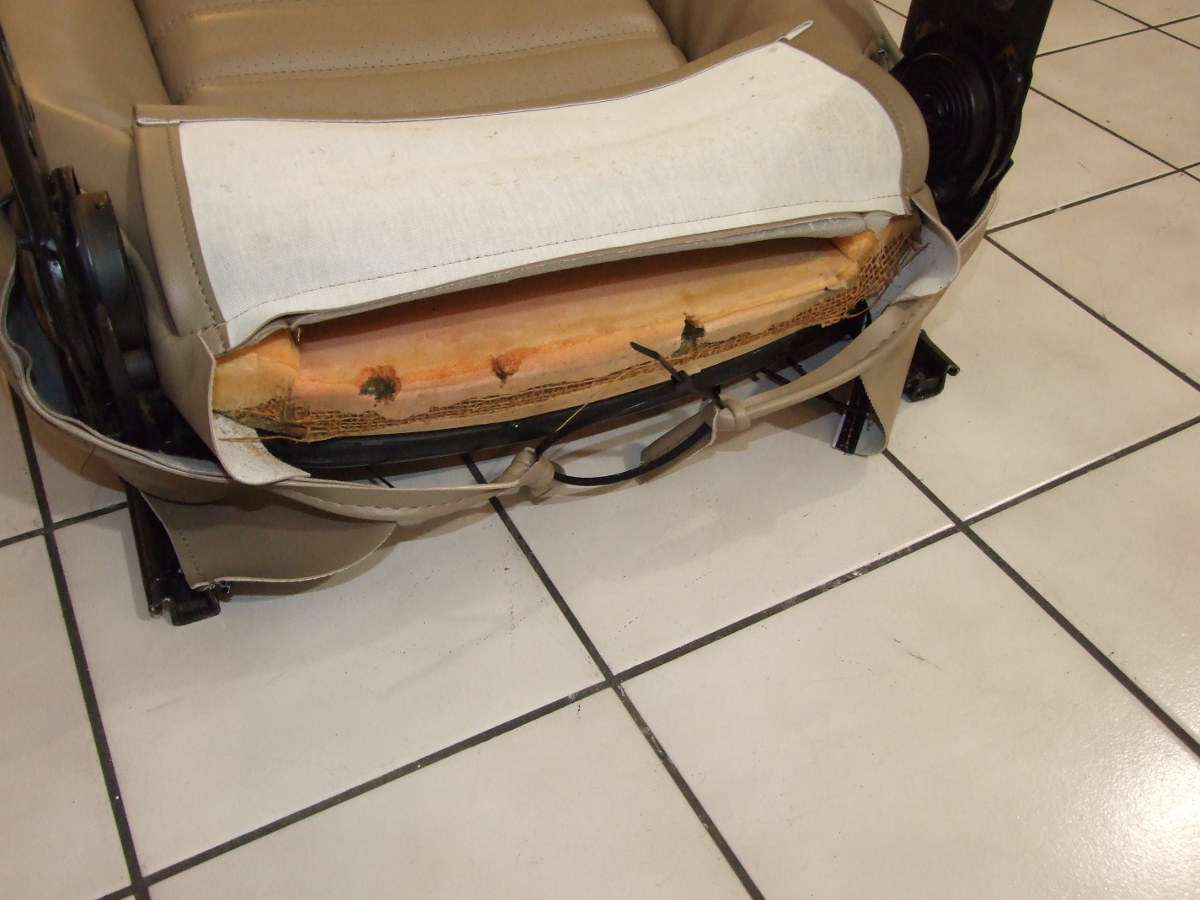
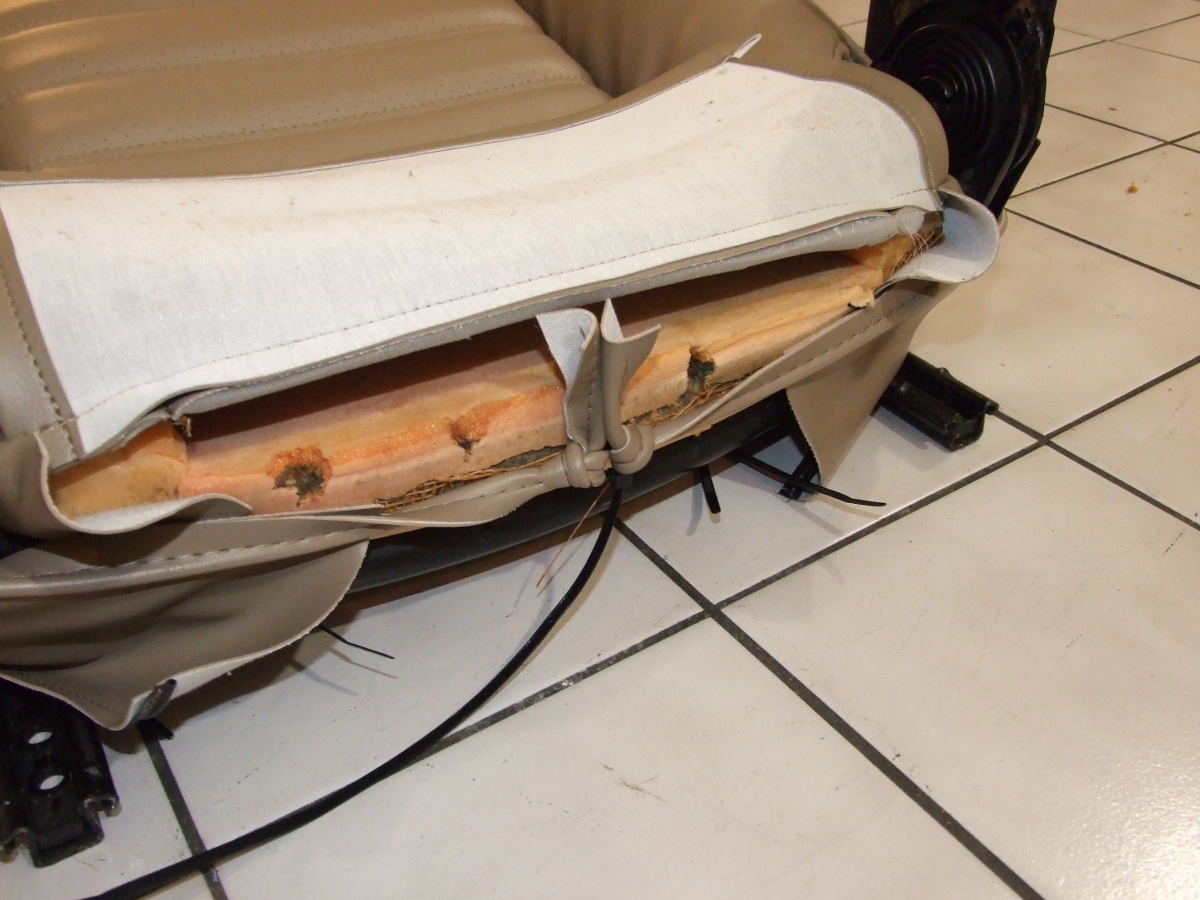
40. Now we can finish the rear of the seat. Start by measuring to the center and marking the cover(with a pencil). Then measure on both sides 1 1/4 inches and make a mark, then measure on each side of those marks 2 1/2 inches and make a mark. After making the marks you can use a hole punch or a razor blade to make 4 very small cuts in the material(not in the center mark). Remember that the cuts only need to be big enough for the zip tie, and they need to be inside the looped and sewn part of the material. Once you have the 4 holes cut, you can slide the last metal rod into the folded material.
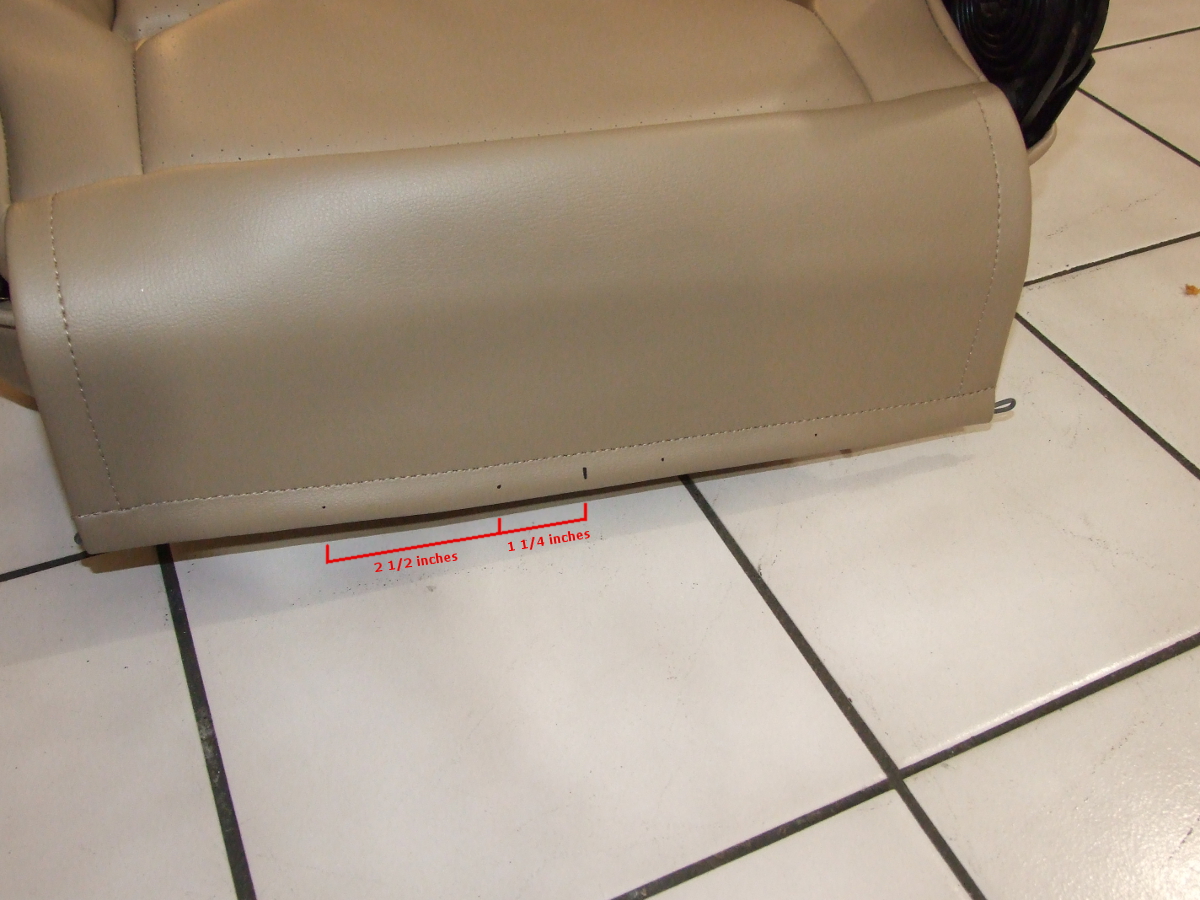
41. Stretch and pull the material while working the foam if needed. Put 4 zip ties through the wholes and around the curvy metal rods on the bottom of the cover. Pull each zip tie a little, one at a time until the material is tight.
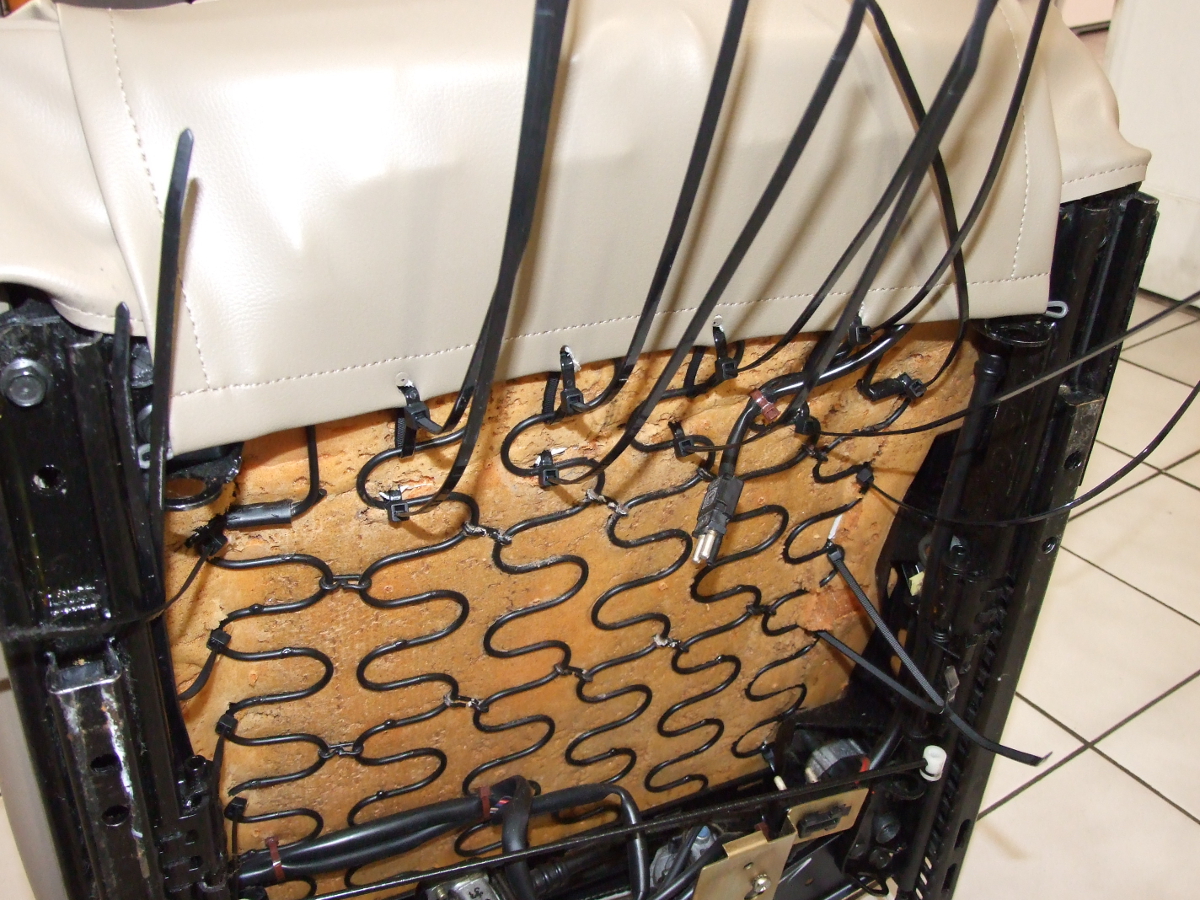
42. Now that the bottom seat cover is fully on, we can replace the zip ties with the hog rings. The zip ties are already holding the cover tight and where it needs to be, so putting the hog rings in becomes very easy. We started with the rear of the cover, but you can start anywhere. Simply clamp the hog ring through the cover and around the metal rod inside the flap, and around the curvy metal rod on the bottom of the seat. Sometimes this might be impossible to do or reach. The zip ties in the very front of the seat are very hard to get to, and for that reason we just left the zip ties in place.
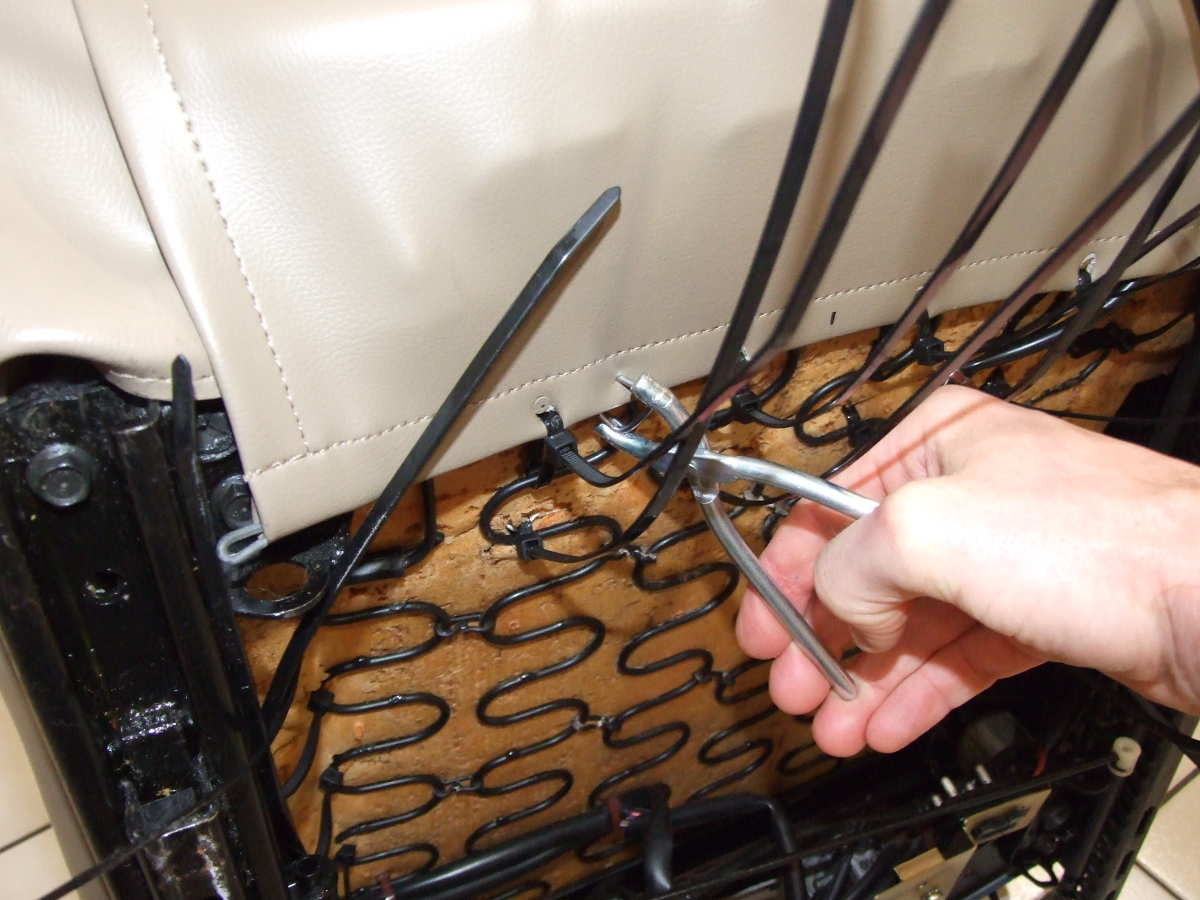
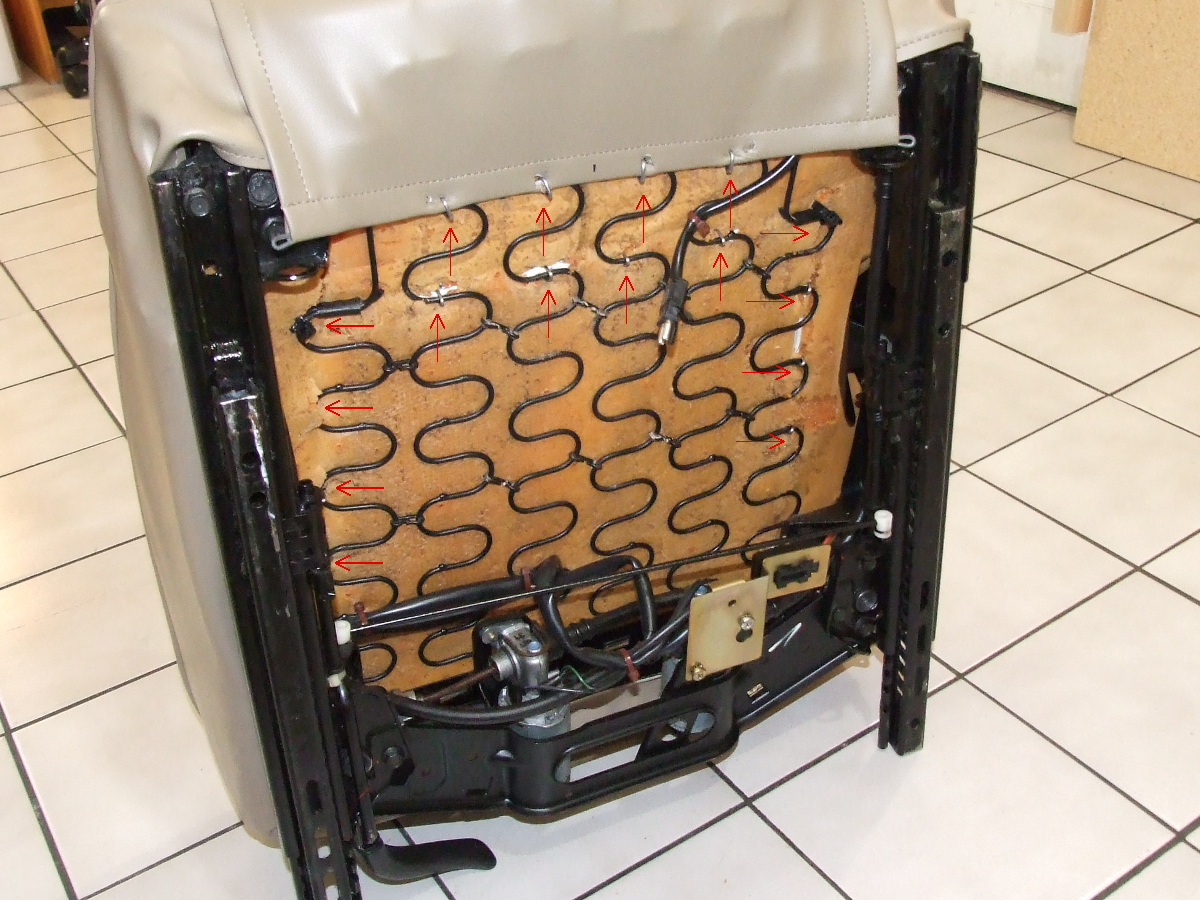
43. Continue to put a hog ring directly beside each of the zip ties. Then, you can cut the zip tie and remove it from the bottom of the seat. The hog rings will be the permanent way to secure the cover.
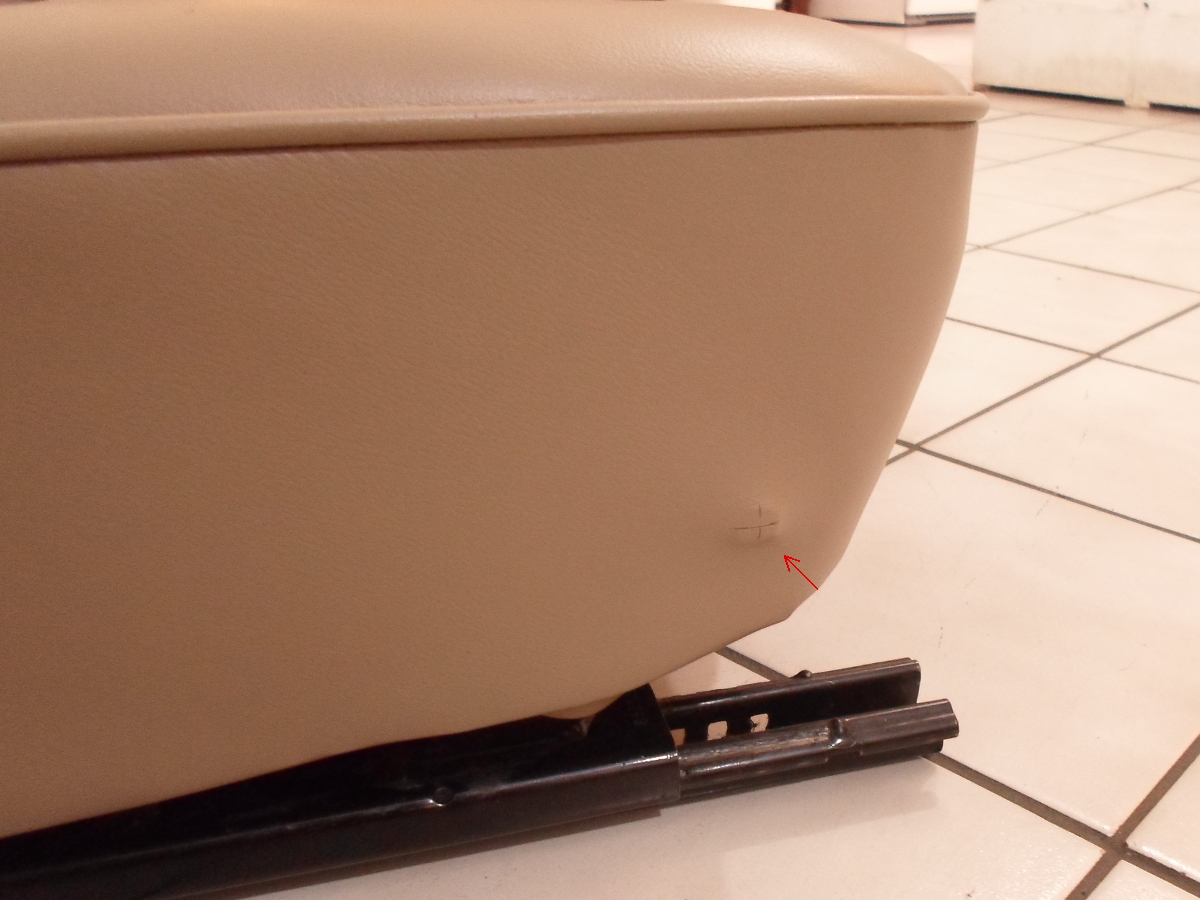
44. Please take your time with this step, go slow and be careful. Next we will make our first cut in the material. Start on the side for the seat adjustment, since it’s easiest. Locate the metal rod pushing on the cover towards the front of the seat. This should be very easy to find, both visually and by touching the cover. Now take a razor blade and carefully make a very small cut on the end of the metal rod, where it’s pushing the material out. Make sure the cut is small, it’s always easier to make the cut larger if needed. As you can see, we made 2 small cuts in the material, in the shape of a cross. Once the cuts are in the material you should be able to easily push the metal rod through the material, like in the second picture.
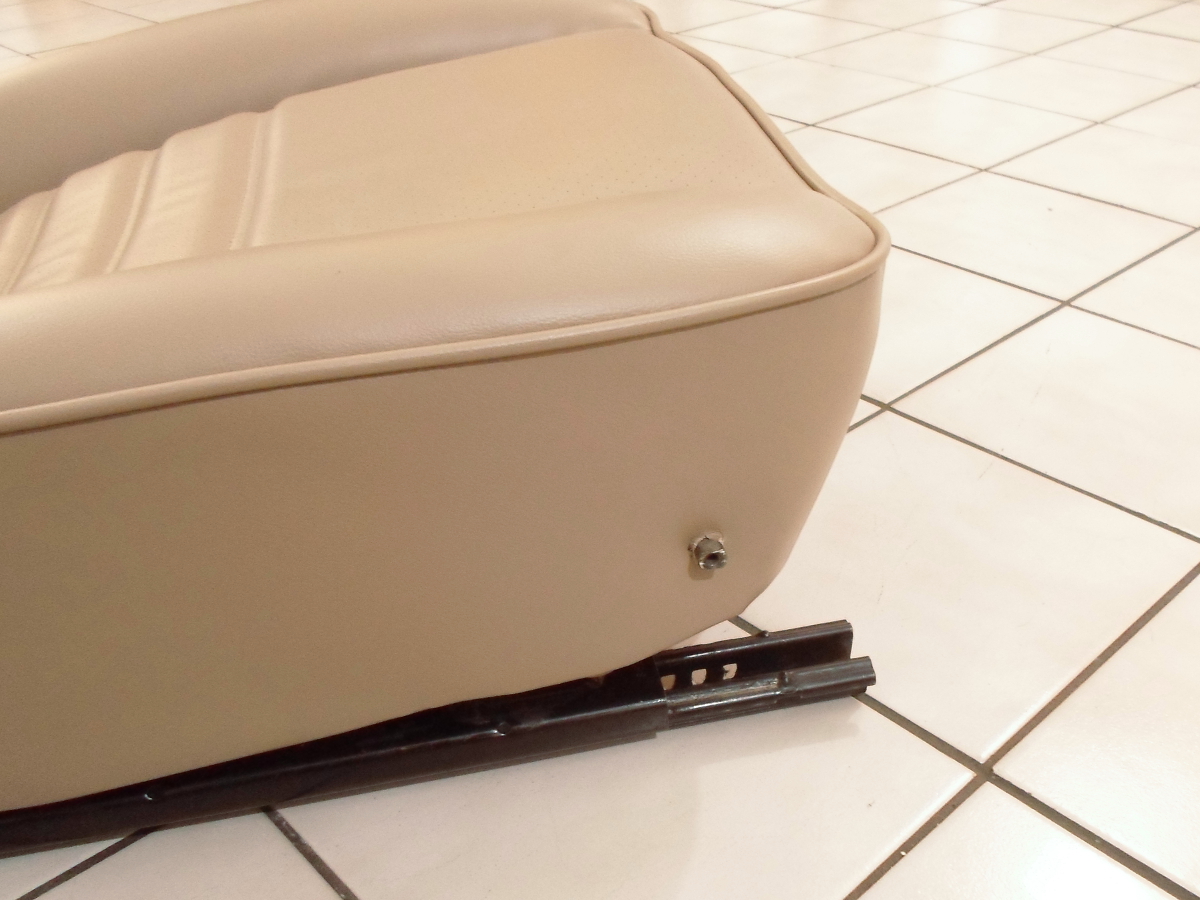
45. Now you can install the handle.

46. Now we can cut the hole in the other side of the cover, for the switches. This side can be a little trickier. Pushing your hand on the cover, find the switches and the frame around the switches. The switches are smaller in diameter and will wiggle, where the frame is larger and more solid. Check out the pictures below to help locate the switches. Please read the next 2 steps before making a cut in the material just to make sure you are cutting in the correct location.
In this picture we drew 2 red arcs where the switches are at. We didn’t make a mark on the material, but if you choose to, use a pencil.

47. Find the middle of the 2 switches like we did in the previous step and make a small cut in the material, up and down between the switches, about 1/2 inches tall. This is so you can make sure you are cutting in the right location. Move the material with your finger and make sure you are cutting in the middle of the switches.
48. Once you have a small cut in the middle of the switches and you know where the switches are, you can cut around the switches. Go slowly and carefully! Only cut around the head of the switches. Just like in the picture below, this is all you need to cut out.
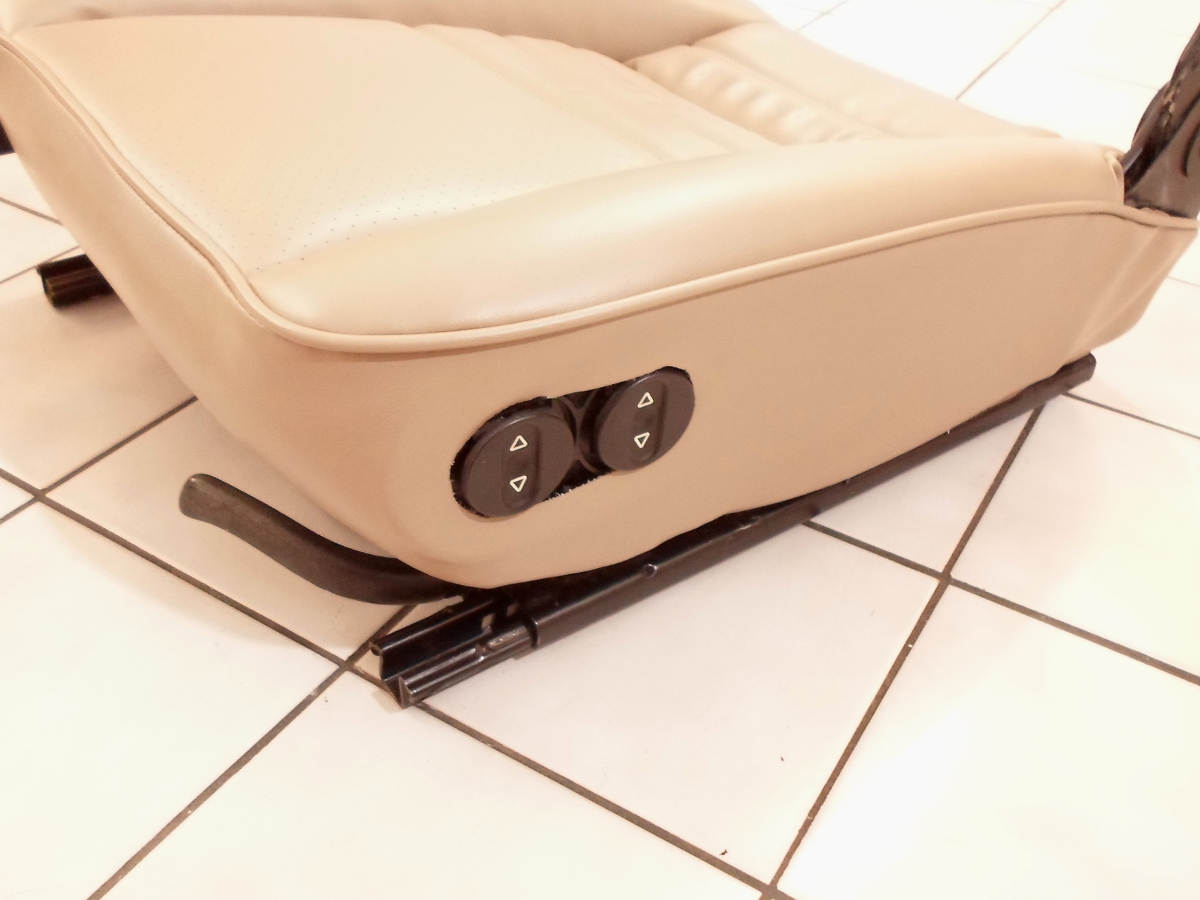
49. Gently pull the switches through the cover.
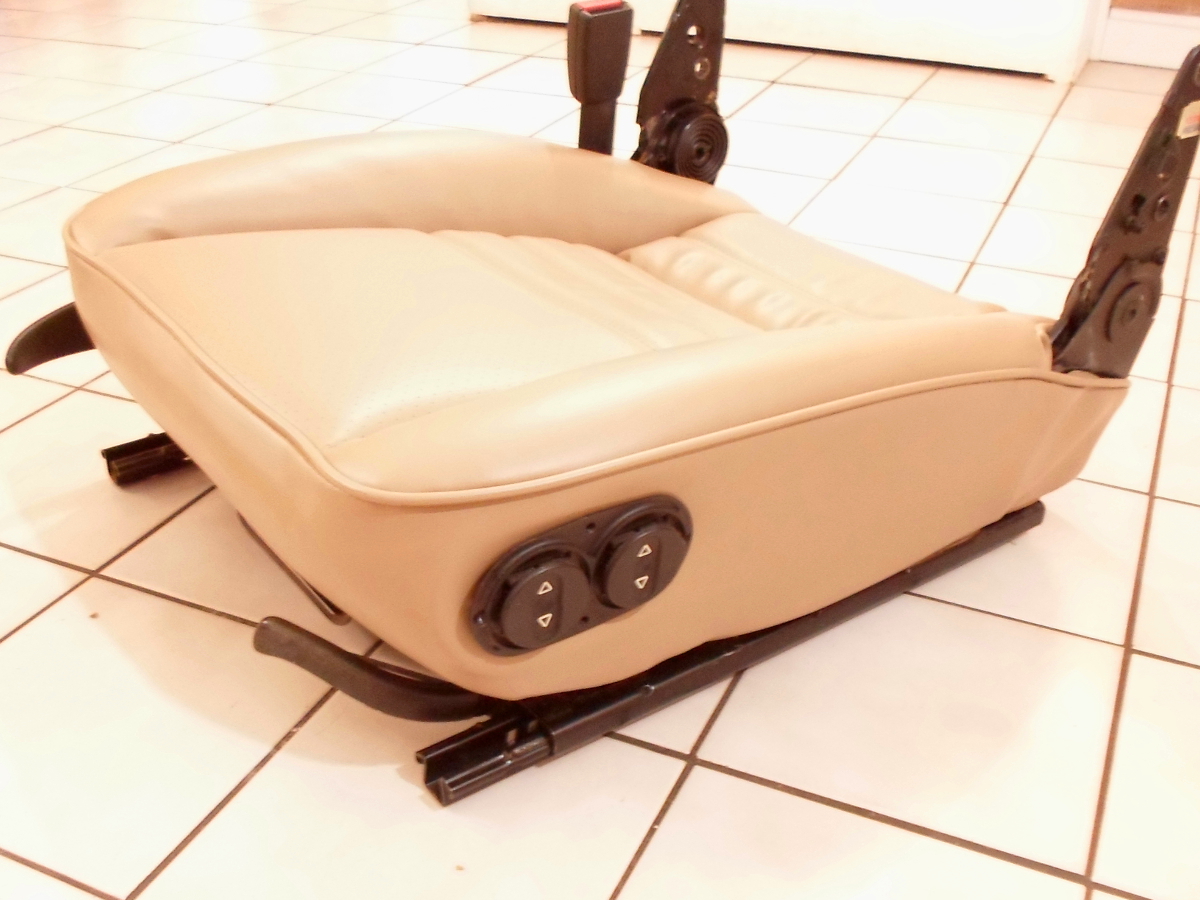
50. Push the switches onto the seat and install the one screw in the front of the switches.

51. Lastly, install the cover over the switches and you are finished with the bottom of the seat.
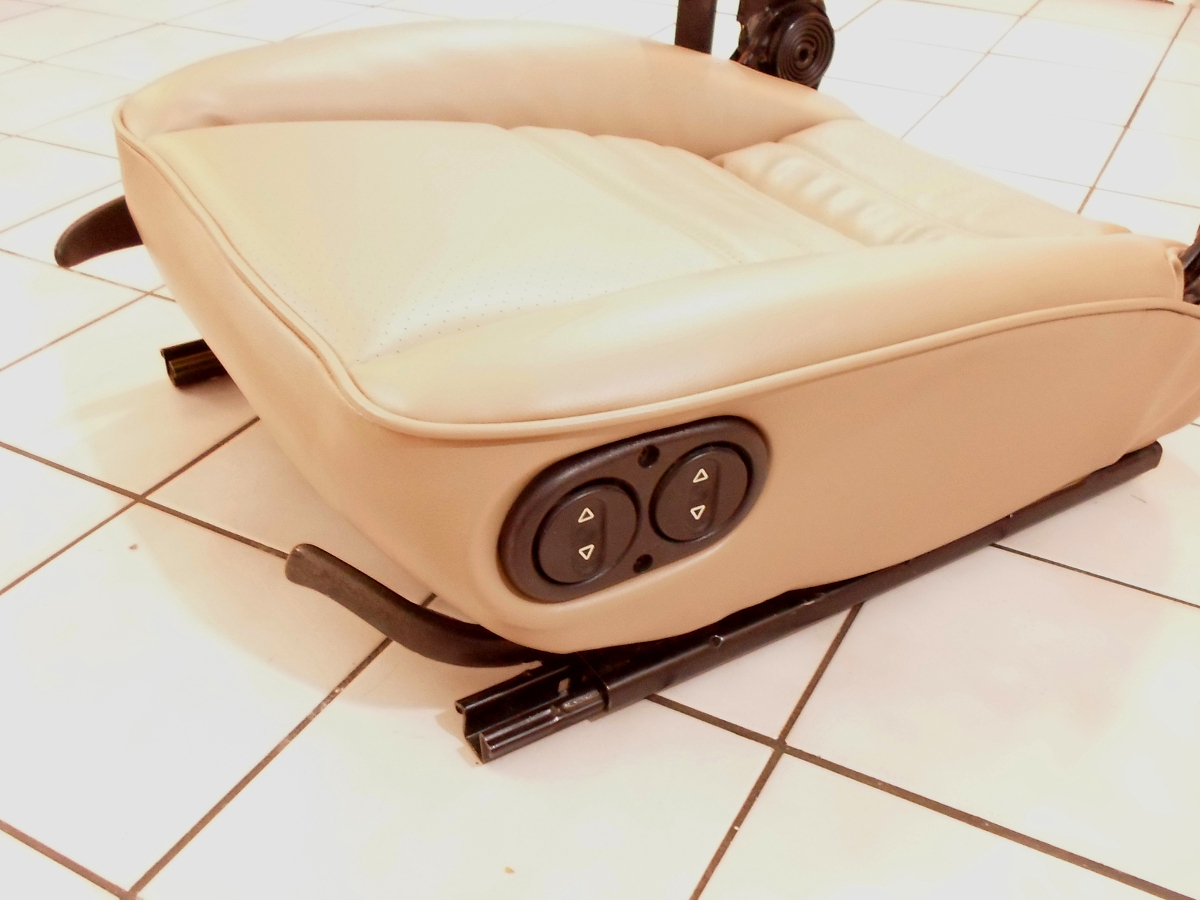
On the next page we will install the seat cover for the top half of the seat.
Page 2 of 3 123